Friday, December 23, 2011

Pie Crust: Gluten Free, Dairy Free

Pie Crust: Gluten Free, Dairy Free, Nut Free

Basic pie crust opens the door for an infinite number of possibilities. I'm pre-making a pie crust for a lemon meringue pie that I'm making in a few days and came up with this recipe and it worked! It's super tasty too!


Pie Crust: Gluten Free, Dairy Free, Nut Free
Fills a 9 inch pie pan.

Ingredients:
1 cup Gluten Free Oat Flour
1/2 cup Tapioca or Potato Starch
1 tsp xanthan gum
1/2 tsp salt
1 stick (6 tbsp cold shortening) Earth Balance dairy free margarine
2 tbsp ice water
Directions:
Preheat oven to 400.
Sift the flour and salt into a bowl. Add 1 stick of Earth Balance and cut in with a pastry blender or fork, until the mix resembles crumbs. Add the water to allow the dough to bind. Gather the dough in a ball and form on a cutting board that has been floured some extra tapioca or potato startch. You can also use some powdered sugar as well.
Roll out the dough to about 1/8 inch thick. Roll the dough up in your rolling pin to transfer it to a 9 inch pie pan. Even it out with your hands and trim the edges with a knife, to leave a 1/2 inch overhang.
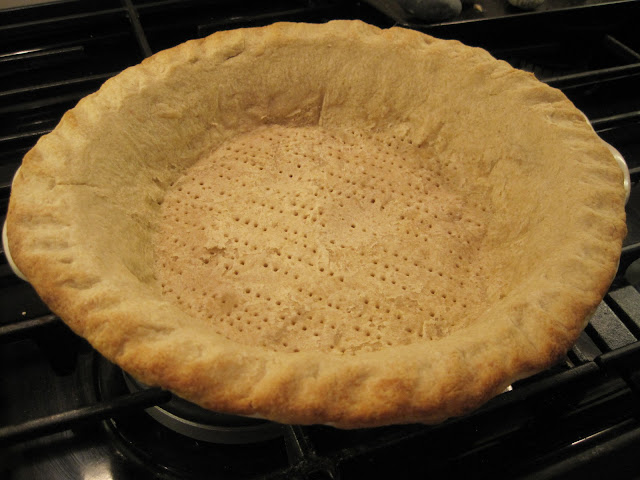
Poke fork holes all over the bottom of the crust. Line the crust with parchment paper and pie weights. I used rocks. Bake for 12 minutes. Remove paper and weights (add your favorite filling) and bake for 6 more minutes until golden.
If your filling needs to bake the entire time with your pie, add it instead of your weights and then bake.


Chewy Chocolate Cookies: Gluten Free, Dairy Free, Nut Free &

Peppermint Chocolate Chip Biscotti: Dairy and Nut free

December 23rd, my official baking day! Christmas Eve also happens to be my birthday. I know, crazy, right? It is. We spend it over at my parent's house eating home made ravioli. As Alton Brown would say, "but that's another show". We host Christmas at our house every year so I'm working away, getting my desserts together. I always make biscotti, and usually some peppermint cookies. This year I decided to combine the two into Peppermint Chocolate Chip Biscotti. My favorite recipe is by Giada De Laurentiis so I started with her recipe and made my alterations from there. These are dairy free (I used Earth Balance instead of butter) and nut free. They are not gluten free since I used regular wheat flour for these. You can try them with your favorite gluten free flour mix, such as Bob's Redmill All Purpose Gluten Free Flour, and let me know how you like them.
For my next cookies, I decided to go with something chocolate. I am a little obsessive about my chocolate, and I found a recipe in a great cook book that I have (available through Amazon.com), "Baking Made Easy", that with a minor adjustment of using gluten free flour, made it gluten and dairy free. They are crispy on the outside, chewy and gooey on the inside and down right chocolate heaven.


Chewy Chocolate Cookies: Gluten Free, Dairy Free, Nut Free
Printer Friendly Version
Makes 18 cookies
Ingredients:
4 egg whites
2 1/2 cups powdered sugar
1 cup unsweetened cocoa powder
2 tbsp Bob's Redmill All Purpous Gluten Free Flour (or other gluten free flour)
1 tsp coffee
1 tbsp water
chocolate chips (if desired)
Directions:
Pretead oven to 350 and line 2 cookie sheets with parchment paper.
In an electric mixer, beat the egg whites until frothy.
Sift cocoa, flour, and baking powder into a bowl and add into mixer along with coffee and the water. Continue mixing on
low speed until well combined.
Fold in chocolate chips, if desired, by hand.
Scoop spoonfulls of batter onto parchment paper on a baking sheet about 1 inch apart.
Bake for 12 - 15 minutes until firm and cracked on top but soft inside.
You will need a metal spatula to scrap them off the parchment paper to transfer the cookies to a cooling rack.


Peppermint Chocolate Chip Biscotti: Dairy and Nut free
Printer Friendly Version
Makes about 24 cookies
Ingredients:
2 cups all-purpose organic flour
1 1/2 teaspoons baking powder
3/4 cup sugar (I use organic evaporated cane juice from Costco)
1/2 cup, or 1 stick of Earth Balance dairy free (I get this at QFC)
1 teaspoon grated lemon zest from a Meyers lemon
1/4 teaspoon salt
2 large eggs (I use free range, hormone free)
3/4 cup ground candy canes (doesn't have to be exact amount)
2/3 cup chocolate chips (Enjoy Life or other dairy free brand)
powdered sugar for flouring the baking sheet (to ease forming log)


Directions:
Preheat the oven to 350 degrees F. 
Line a heavy large baking sheet with parchment paper. Scoop a little spoon full of extra flour and some extra powdered
sugar for flouring your dough. This makes it easier to work with as the dough will be sticky. Using a combo of flour and
powdered sugar helps the dough to not get to dry.
Whisk or sift the flour and baking powder in a medium bowl to blend. Using an electric mixer, beat the sugar, Earth
Balance, lemon zest, and salt until combined. Beat in the eggs. Add the flour mixture and beat just until blended.
I used my Vitamix to chop the candy canes into a powder. You can also fill the unwrapped candy canes in a zip bag and
hit with a mallet until well pulverised. Stir in the candy canes and chocolate chips by hand.
Place dough on top of baking sheet, pre lined with parchment paper and a little pile of flour and powdered sugar. Form
the dough into a 13-inch long, 3-inch wide log on the prepared baking sheet. The dough will be sticky. I often spray my
hands with cooking spray. Work the dough into your little pile of flour/powdered sugar, using the parchment paper to
help you fold the dough into the flour. The dough will become easier to handle so you can form it into a log.
Bake until light golden, about 40 minutes. Cool for 30 minutes.
  
Place the log on the cutting board. Using a sharp serrated knife, cut the log on a diagonal into 1/2 to 3/4-inch-thick
slices. Arrange the biscotti, cut side down, on the baking sheet. Bake the biscotti until they are pale golden, about 15
minutes. Transfer the biscotti to a rack and cool completely.

Biscotti can be made ahead. Store them in an airtight container up to 4 days, or wrap them in foil and freeze in
resealable plastic bags up to 3 weeks.


Have a very Happy Holiday Season and a Happy New Year!
Thursday, November 24, 2011

Pumpkin Chocolate Chip Cupcakes with Maple Buttercream Frosting: gluten free, dairy free, vegan


"Mom, what can I bring to Thanksgiving this year?" I ask. Mom says, "Could you please bring a dessert for the Intolerants?" That's what she calls those of us who can't have this or that.
I hang up the phone and start to ponder. Do I go with making a gluten and dairy free version of the pies that will already be there, or do I come up with a dessert that goes with the Thanksgiving theme, but is it's own happy little dessert. Cupcakes! Everyone and their mother, sister and brother are making everything in cupcake form these days. I pulled out my Vegan Cupcakes Take Over The World cookbook for some inspiration. I love all of the creative cupcake ideas in this book but have yet to bake out of it. This cookbook series lured me in because it's so adorable, with other titles like Pie In The SkyIsa Chandra Moskowitz and Terry Hope Romero have some really great cookbooks that you can get on Amazon.com.

Like with any cookbook, I still need to make some modifications with it. As I flip through the pages my eye catches the Pumpkin Chocolate Chip Cupcakes with Cinnamon Icing. Yum, pumpkin and chocolate, two of my favorite things. I review the recipe. Let's see here; I'll use less oil and add applesauce, instead of soy milk I'll use coconut milk, instead of all purpose flour I'll use gluten free flour, then I'll add some flax meal to make up for the missing gluten. I like the taste of ginger in pumpkin, so I'll add a bit of that too. Instead of Cinnamon Icing, I'm going to create a vegan maple buttercream frosting. So, here's my take on their recipe.

Pumpkin Chocolate Chip Cupcakes with Maple Buttercream Frosting: gluten free, dairy free, vegan and nut free
Printer Friendly Version

Ingredients:
1 cup pureed pumpkin
1/3 cup apple sauce
3 tsp canola oil
1 tbsp flax meal
1 cup organic pure cane juice sugar
1/4 cup So Delicious Vanilla Coconut milk
1 tsp vanilla extract

1 1/2 cups Bob's Redmill Gluten Free Flour
1/2 tsp baking powder
1/2 tsp baking soda
1/2 tsp ground cinnamon
1/4 tsp ground ginger
1/4 tsp salt
1/2 cup chocolate chips

Directions
Preheat oven to 350 and fill your cupcake tin with cute cupcake papers.
In a bowl or mixer combine all wet ingredients and mix.
In a seperate bowl, combine all dry ingredients and wisk together.
With the mixer on low, add your dry ingredients to your wet until well combined.
Add the chocolate chips and stir by hand so you don't break your chocolate chips with your mixer.
Fill your cupcake paper lined cupcake tins with 1/4 cup of batter in each.
Bake in your oven on 350 for 25 - 28 minutes.
The cupcakes are done when a toothpick inserted comes out clean.
Immediately and carefully remove the cupcakes out of the cupcake tins.
Cool your cupcakes on a cooling rack.
Frost when completely cooled.


Maple Buttercream Frosting: gluten free, dairy free, vegan, nut free

Ingredients
1 lb. powdered sugar
2/3 cup - 1 stick Earth Balance
1 tsp vanilla
1/4 tsp salt
1/4 cup + 5 tbsp 100% pure maple syrup

Directions
In your mixer, combine powdered sugar, Earth Balance, vanilla,  and salt.
Mix starting on low, then moving to high speed.
Go back to low speed and slowly add the maple syrup until well combined.
Bring mixer speed back up to high and whip your frosting for a good couple minutes.

Use a piping bag or a plastic sandwich bag with a small bit of the end cut off to pipe your frosting on your cupcake. Here I added a blob to the center of the cupcake.


With a kitchen knife, I patted the frosting as I moved the cupcakes in a circle. I then finished it off with a swirling motion with the kitchen knife. Thanks for the tip, Mom. :-) I topped them with a few chocolate chips to give you an idea of what's inside.


Serve them up to those you are thankful for.

Happy Thanksgiving!


Monday, November 14, 2011

Banana Muffins or Banana Bread: vegan, gluten free, dairy free, and nut free


As I type, my house is filled with the aroma of freshly baked banana muffins. My son is happily enjoying a banana muffin as his after school snack, while watching his favorite episode of Curious George. He usually eats bananas every time he watches that show, so why not banana muffins, right?
He got off the bus this afternoon and was hungry, as usual. He asked for banana bread, "like at the coffee shops", he said. As we walked home, I told him that I could try to make some really quickly. What was I saying? Really quickly? I realized that I hadn't come up with my own banana bread concoction yet, so I thought I'd give it a try.
I'm trying to use healthy oils, but in small amounts to create a low fat result. I'm also trying to use less sugar and more fiber. I need these to be healthy for my whole family and not be something that's trouble on my waistline. I use flax meal to not only replace eggs but to add fiber. I just started experimenting with xylitol. In this recipe I used half organic sugar and half xylitol and got great results. I'm super happy with how they turned out. I made them in my Vitamix, poured the batter in my muffin tins, baked them up and in less than 30 minutes, had healthy and delicious banana muffins. I'd call that really quick.

My son said that he liked this particular muffin the best because he thought it looked like a Rock Star. Just as I was taking a picture of it, a little hand suddenly appeared, and took another muffin.


Banana Bread or Banana Muffins:
vegan, gluten free, dairy free, and nut free
By: Kendra Hubbell

Ingredients:
2 bananas (or about 1 1/2 cups mashed banana)
4 tbsp flax meal mixed with 6 tbsp warm-hot water (stir together separately before adding)
2 tbsp coconut oil (or olive oil or Earth Balance)
1 cup organic sugar or xylitol (or 1/2 cup sugar and 1/2 cup xylitol)
2/3 cup So Delicous Vanilla Coconut Milk (or other non-dairy milk plus 1 tbsp vanilla)
1 tbsp baking powder
2 tsp baking soda
1 tsp salt
1 tbsp cinnamon
2 cups Bob’s Redmill Gluten Free All Purpose Flour (or other Gluten Free Dairy Free flour mix)

Directions:
Add wet ingredients in Vitamix, (or blender or mixer of your choice) followed by the dry ingredients and blend well. If you don’t have a mixer, you can mix the wet ingredients in a bowl with a whisk. 
Add all dry ingredients in another bowl and stir to combine. Then combine the wet with the dry and mix well. Put ¼ cup of the batter into muffin tins that have been sprayed with your favorite gluten free vegan cooking spray or muffin and cupcake papers.
Bake in a 350 degree oven for 12 – 15 minutes or until an inserted toothpick comes out clean.
To make bread instead of muffins: Bake your batter in a bread pan. Your baking time will be longer, about 25-30 minutes or until inserted toothpick comes out clean.

Enjoy!

Sunday, October 30, 2011

Sugar Cookies: dairy free and nut free

I got a frantic voice message from my friend today, asking how she could make dairy free sugar cookies. Her son is allergic to cow's milk and she's been tasked with baking sugar cookies for his class Halloween party! She said, "I can, and still want to use wheat and eggs though."
Sugar cookies are a great thing to bring to a class party. The kids can decorate them and eat them too. The rough part is that there are so many kids with food allergies or sensitivies these days. In some areas, you can find stores that offer baked goods to accomidate special needs.

Last year, in my son's Kindergarten class, every common allergy was represented. This is when I experiemented many hours to come up with a Sugar Cookie Recipe that was gluten free, dairy free, soy free, and nut free out of necessity. If you are choosing to take matters into your own hands, be sure your kitchen is super clean of any of the offending ingredients before baking.
This year I'm baking dairy free and nut free sugar cookies in the shape of pumpkins for my daughter's class. There are just dairy and nut issues in her class, she being one with a dairy issue. This recipe was inspired by a Better Crocker recipe. What's great about sugar cookies is that the treat is also the activity. The kids love to make their own tasty creations.


Sugar Cookies: dairy free and nut free
(does contains wheat, gluten, eggs, and soy)
1 1/2 cups powdered sugar
1 tbsp vanilla
1 large organic egg
1 tsp baking soda
1 tsp cream of tartar
Mix powdered sugar, Earth Balance, vanilla and egg in your mixer bowl.
Cover and refrigerate for at least 2 hours.
Heat oven to 375. Grease cookie sheet with cooking spray, Earth Balance or use a Silpat.http://www.amazon.com/s/ref=nb_sb_noss?url=search-alias%3Daps&field-keywords=silpat&x=0&y=0
Divide dough in half and form into balls. Refrigerate for at least 2 hours.
On a lightly floured cutting board type surface, roll out one of the dough balls to 1/4 inch thick. I often like to "flour" with part flour and part powdered sugar. Using powdered sugar helps you not to over flour your dough. You may mind your dough needs more flour too.
Cut your rolled out dough into desired shapes. I got a great Wilton pumpkin shaped cookie cutter from Amazon.com. I've linked to it here and you can see a picture of it below. I love their comfort grip cookie cutters. I also have one in the shape of a heart for Valentines Day.
Sprinkle with granulated sugar or you can leave it off if you plan to decorate the cookies later.
Bake 7 - 8 minutes or until edges are lightly brown. Cool on wire rack.
Enjoy as is or decorate with frosting.

Frosting: dairy free and nut free
2 - 4 cups
powdered sugar
2 tbsp clear vanilla extract (Using clear vanilla keeps your frosting white, if desired. Regular
vanilla extract will turn your frosting a bit off white. You can add food coloring or fruit juice to add color.)
1/4 - 1/2 cup Earth Balance (sticks or spread works)
Mix the above ingredients in you favorite mixer. I use the Kitchenaid for this with the paddle attachment.
Enjoy!

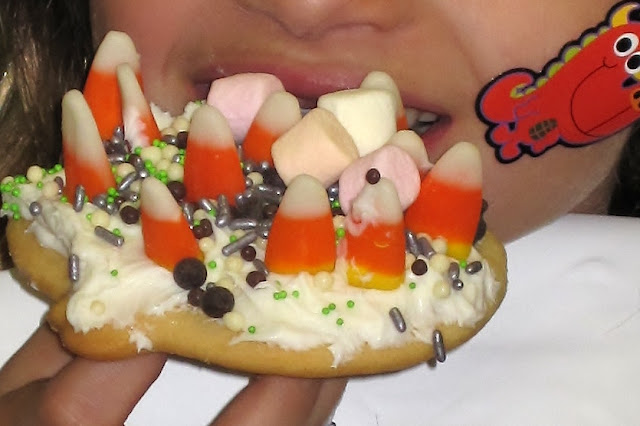
The kids seemed to have a great time at their class Halloween party. We had parents send in items to decorate the cookies with.


Check out this creation! She only took a bite or two and saved it for later.


Thursday, October 27, 2011

Butternut Squash Soup with Shallots and Leeks: gluten free and dairy free

Last weekend we walked on over to the farmer's market, just as we do every Sunday to get our produce for the week. At the market the kids picked out leeks, carrots, shallots, and some special jams for their sandwiches for school. Getting them involved in choosing the produce seems to encourage them to eat it. I happen to load up on butternut squash among other things, which also helped inspired our first soup of the rainy season.When I asked my nine year old daughter what we should put in our Butternut Squash Soup she said leeks, shallots, and tomato paste. Okay then. She took notes for me as I cooked.

Butternut Squash Soup: gluten free and vegan

Makes a lot of soup, you can half this recipe to make less.
Ingredients:
1 butternut squash (whole or precut)
6 carrots
1 shallot bulb, chopped
1 yellow onion, chopped
2 leeks, chopped
Olive oil
Chicken broth, homemade (or 2 boxes organic broth)
1 medium roll of goat cheese
1 can Organic Tomato paste (or pureed tomatoes from your counter, that are no longer suitable for your salads.)
2 tsp – 1 tbsp Nutmeg to taste
Salt and pepper to taste
Directions:
Cut the Butternut Squash into pieces and use a peeler to remove the skin.
Cut carrots into rounds. I keep the skin on so I don’t lose that extra fiber.
Boil the squash and carrot pieces for 7-9 minutes or steam them for 6-8 minutes.
In a stock pot sauté the chopped onion, shallots, and leeks until onion is transparent.
Scoop out the squash and carrots with a strainer scoop or slotted spoon and put in your blender. I used my Vitamix and pureed the mixture on high speed.
Add the squash and carrot puree to the onions, shallots and leeks in your stock pot.
Pour in the chicken broth until desired texture.
Break up the goat cheese and add it along with tomato paste, nutmeg, salt and pepper.
Heat on high until the mixture bubbles then reduce the heat to a simmer and cook covered for about 20 - 30 minutes.
Serve warm. I like to sprinkle pecorino Romano (sheep’s cheese) on top. Serve warm. I like to sprinkle pecorino Romano (sheep’s
cheese) on top.
Enjoy!

Wednesday, October 26, 2011

Chocolate Cupcakes: gluten free, dairy free, egg free, vegan

Halloween cupcakes, beautifully decorated for Halloween by my children.

I am a huge fan of Bob's Redmill products. Their website offers a ton of recipes to choose from. Many address food sensitivity and food allergy issues. I still find that I have to make my own personal alterations. This post is a great example of that.

My mom loves to have fun with our kids for Halloween. She was so sweet and planned to do cupcake decorating with our kids during our one of our October Sunday dinners. She wanted to be sure to make them so they accomidated my kids, my Dad, and myself, so she asked me for a recipe. I pointed her to the Bob's Redmill site for ideas. She found this gluten free chocolate cake recipe that I link to here that is gluten free.
Here's how I used it as a base and change it into a recipe for gluten free, dairy free, and egg free chocolate cupcakes. This is a great example of how you can make a few subsitutions to accomidate your specific needs.

Chocolate Cupcakes: gluten free, dairy free, egg free
Makes 12 cupcakes.

Ingredients
1-1/2 cup Bob's Redmill Gluten Free All Purpose Baking Flour
1 cup Organic Evaporated Cane Sugar
1/2 cup Cocoa powder, unsweetened
1 tsp. Baking Soda
1 tsp. Flax Meal
3/4 tsp. Salt
1/2 cup vanilla So Delicious Coconut Milk or other dairy free milk
1/3 cup Earth Balance
3 tbsp apple sauce plus 1 tsp baking powder mixed
1 tsp. Vanilla
3/4 cup warm brewed Coffee or decaf chai tea (this brings out the chocolate flavor)

Directions: 
Preheat oven to 350°F. Prepared cupcake tins with cupcake papers.
Place all ingredients, except coffee, in large bowl and blend with wisk or your favorite mixer. I use my Vitamix and so does my Mom.
Add coffee and mix until thoroughly blended.
Pour batter into cupcake papers in cupcake tins and bake for 15-20 minutes or until toothpick inserted in center of cupcakes comes out clean.

White Vanilla Frosting

Ingredients
2 - 4 cups powdered sugar
2 tbsp clear vanilla extract (using clear keeps your frosting white. Regular vanilla extract will turn your frosting a bit off white)
1/4 - 1/2 cup Earth Balance (sticks or spread works)
Directions
Mix the above ingredients in you favorite mixer. I use the Kitchenaid for this with the paddle attachment.
Be sure your cake or cupcakes have cooled before frosting them. Spread over your cupcakes or scoop into a plastic zip bag with the end cut, or your favorite piping bag and pipe onto your cupcakes.


Mummy faces created with white frosting and orange and black cake decorating gel.


My son made his own version of a cupcake ghost.


Here are some gluten free, dairy free, egg free mummy cupcakes. My mom got this idea by searching for images of "mummy cupcakes" on-line. There are several interpretations. This is what we came up with.


Enjoy!